


When it comes to building your own DIY electric skateboard, one of the most critical components is the battery. It’s the heart of your E-board—determining your range, power, acceleration, and safety. In this guide, we’ll break down everything you need to know about DIY e-skate batteries so you can make smart, safe, and high-performance decisions.
Understanding Battery Basics: Voltage (V) and Capacity (Ah)
When you're looking at electric skateboard batteries, you'll primarily encounter two main specifications:
Voltage (V): The Power Behind Your Punch Voltage is essentially the "pressure" of the electricity flowing from your battery. Think of it like water pressure in a hose – higher pressure means more force. In an electric skateboard, higher voltage generally translates to:
- Higher Top Speed: More voltage means your motor can spin faster, allowing for greater maximum speeds.
- More Power/Torque: You'll experience stronger acceleration and better hill-climbing ability.
Electric skateboard batteries are typically configured in series (S) to achieve the desired voltage. Common configurations include:
- 10S (36V nominal): A popular choice for many DIY builds, offering a good balance of speed and range.
- 12S (43.2V nominal): Provides noticeably more power and higher top speeds, often preferred by experienced riders or for performance-oriented builds.
- Other configurations: You might see 6S or 8S for smaller, less powerful boards, or even 14S for extreme performance.
Remember, your Electronic Speed Controller (ESC) and motor must be compatible with your chosen battery voltage. Always double-check their maximum voltage ratings!
Capacity (Ah): Your Range Extender Capacity, measured in Ampere-hours (Ah) or milliampere-hours (mAh), tells you how much energy your battery can store. This directly translates to your range – how far you can travel on a single charge.
- Higher Ah = Longer Range: A battery with a larger capacity will allow you to ride for more miles before needing to recharge.
- More Cells = More Capacity: Capacity is increased by connecting individual battery cells in parallel (P). For example, a "2P" configuration means two cells are connected in parallel, effectively doubling the capacity of a single cell.
When looking at individual cells like the Samsung 50S 21700 cells mentioned in the initial blog, they have their own mAh rating. The total capacity of your battery pack is determined by the mAh of the individual cells multiplied by the number of parallel groups.
Types of Batteries Used in DIY Electric Skateboards
There are two most common types of batteries in the DIY community are Lithium-Ion (Li-ion) and Lithium Polymer (LiPo). Here's how they compare: Lithium-Ion (Li-ion) Batteries: The Gold Standard
For most DIY builders, lithium-ion batteries are the go-to solution—and for good reason. They strike an exceptional balance between performance, longevity, and safety, making them ideal for everyday riding, commuting, and even high-performance setups.
Advantages:
- High Energy Density: Li-ion cells can store a large amount of energy in a compact, lightweight package—perfect for sleek board designs without sacrificing range.
- Good Power Output: They can deliver the high current required by powerful motors, supporting fast acceleration and hill climbing.
- Long Lifespan: Li-ion batteries can endure hundreds of charge cycles with minimal capacity loss, giving you consistent performance over time.
- Stable Voltage: Provides a smooth and predictable power curve throughout your ride.
Most Common Cell Types:
18650 Cells: These cylindrical cells (18mm x 65mm) resemble a larger AA battery. They’re widely used due to their good balance of capacity and power.
✅ Popular pick: Samsung 30Q – known for solid performance and affordability.
21700 Cells: A larger format (21mm x 70mm) that offers even higher energy density and better heat management. Ideal for high-discharge, high-performance boards.
✅ Popular picks: Molicel P42A, Samsung 50S – excellent for builders who want max torque and long range without bulk. Downsides:
- Slightly heavier than LiPo for the same output
- Generally, more expensive upfront
Ideal for: Most riders—from beginners to advanced DIYers—seeking a long-lasting, reliable battery with great performance across all terrains.
Lithium Polymer (LiPo) Batteries: Lightweight Power with Trade-Offs
LiPo batteries are known for their high discharge rates and compact form factor, making them appealing for some niche DIY setups. However, they require much more caution in both building and riding.
Advantages:
- Extremely High Discharge Rates: Great for high-drain motors and short bursts of power (e.g., racing or stunts).
- Lightweight: Slightly lighter and slimmer than Li-ion batteries, which can help reduce E-board weight.
Downsides:
- Higher Risk: Prone to swelling, fire, or explosion if overcharged, punctured, or poorly maintained.
- Shorter Lifespan: LiPo packs generally last fewer cycles than Li-ion equivalents.
- Manual Balancing Required: Unlike Li-ion packs with integrated BMS, LiPos often need external balance chargers.
Used By: Advanced builders or racers who prioritize maximum power in short rides and are experienced with proper battery care and handling.
Crucial Safety Considerations: Don’t Skip This Step!
Working with Li-ion batteries requires utmost care. These powerful energy sources can pose serious risks, including fire or explosion, if mishandled. That’s why proper battery protection, management, and installation are non-negotiable in any DIY electric skateboard build.
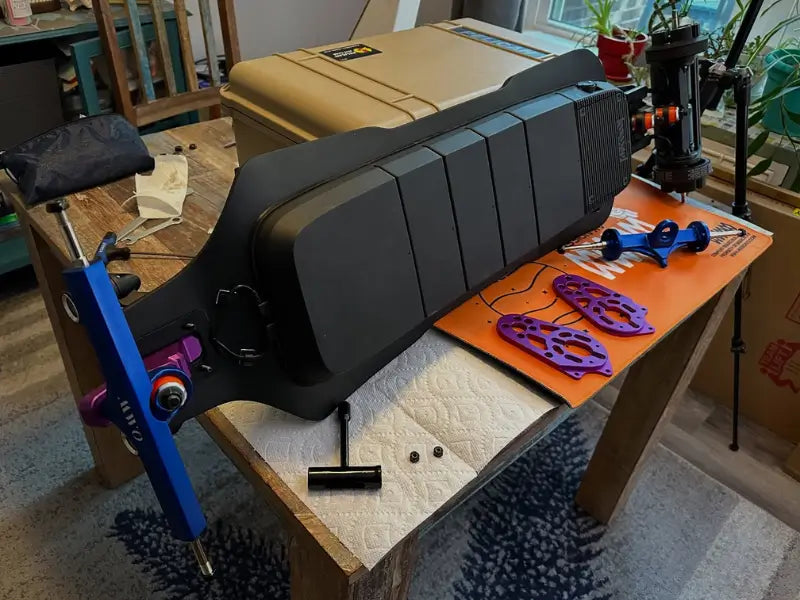
Battery Enclosure: More Than Just a Box
Your battery pack needs to be housed in a sturdy, waterproof, and impact-resistant enclosure, but not all enclosures are created equal.
OMW Boards, for example, has engineered a suspended, fully enclosed, aluminum alloy armored battery compartment system with two separate chambers, designed specifically for performance and protection. This unique design achieves:
- Controlled deck flex: The suspended design retains deck neck and deck body flex independently, enhanced by padded grip tape, giving riders a comfortable, vibration-dampened ride.
- Extreme rigidity: The aluminum housing resists high-impact collisions and is even built strong enough to shield against moderate explosions.
- Vibration protection: By enclosing both the battery cells and control circuitry in a rigid compartment, it prevents micro-vibrations from weakening internal connections over time.
- Fire resistance: With a metal compartment and flame-retardant end caps, oxygen is cut off in the event of ignition, helping extinguish flames quickly.
- Superior heat dissipation: Aluminum alloy conducts heat hundreds of times better than plastic, helping the pack stay cooler and operate more efficiently under stress.

Whether you’re using a custom-built solution or a prebuilt pack, ensure your enclosure can protect against impacts, vibrations, heat, and fire, because your safety depends on it.
Battery Management System (BMS): Your Battery’s Guardian Angel
A Battery Management System (BMS) is essential. This small circuit board protects your battery by managing:
- Overcharge Protection – Prevents cells from exceeding safe voltage.
- Over-discharge Protection – Avoids damaging low-voltage conditions.
- Over-current Protection – Cuts power to stop short circuits.
- Temperature Monitoring – Shuts down if temperatures rise dangerously.
- Cell Balancing – Keeps each cell at the same voltage, extending battery life.
Never operate a Li-ion pack without a properly sized and functioning BMS.
Charging Best Practices
- Use the Correct Charger: Always match your charger to your battery’s voltage and chemistry.
- Charge in a Safe Area: Use a non-flammable surface, away from flammable items, and ensure ventilation.
- Monitor Charging: Never leave a battery charging unattended, especially during initial cycles.
- Avoid Full Storage: For long-term storage, keep batteries at ~40–50% charge, not full or empty.
Physical Handling and Inspection
- Avoid Damage: Never drop or puncture your battery pack.
- Prevent Shorts: Double-check all connections and insulate exposed contacts.
- Inspect Regularly: Look for swelling, strange smells, loose mounts, or exposed wires.
 Choosing the Right Battery for Your Build
When selecting your battery, consider these factors:
- Desired Performance: Do you want high speed and torque (higher voltage) or maximum range (higher capacity)?
- Budget: Larger capacity and higher voltage batteries generally cost more.
- Space Constraints: Ensure the battery pack will physically fit within your chosen enclosure and deck.
- Weight: A larger battery will add more weight to your board.
- ESC and Motor Compatibility: This is critical. Make sure your other electronics can handle the battery's voltage and current output.
Building your own electric skateboard battery pack can be one of the most challenging yet rewarding parts of your DIY journey. By understanding voltage, capacity, and, most importantly, adhering to strict safety protocols, you'll ensure your custom e-board has the power it needs for countless exhilarating rides.
In our next deep dive, we'll demystify the Electronic Speed Controller (ESC) and show you how this crucial component acts as the brain of your electric skateboard.